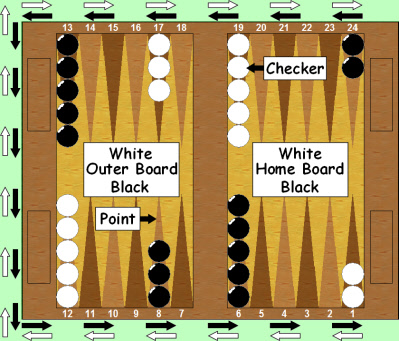
Bearing Off Against Opposition On The Bar
Whenever a checker is hit in backgammon just like in ludo he has to go back to the start. A checker is hit by an opponent landing upon the same point occupied by a single checker of the opposing side; single checkers are called blots and are very vulnerable to being hit - blots are protected by having two or more checkers of the same colour on a point, this point now belongs to that player and cannot be landed on by the opponent (although, if dice rolls allow, they can be leapt over providing both dice rolls are not blocked). As you might have gathered, having a blot hit while you are bearing off is a major setback and is to be avoided if at all possible. Thinking ahead can result in fewer positions in which this can occur.
The 'start' for blots that are hit is the bar or 25-point as it is sometimes referred to (the bar is the central divider between the two halves of the board). The checker on the bar can only re-enter into an opponent's inner board by rolling dice that correspond to the point numbers in his opponent's inner board (1 to 6, which are in fact points 24- down to 19- for the player on the bar) which are either unoccupied or are occupied by a blot or one or more of his own checkers. Points 'covered' by your opponent (two or more checkers on a single point) cannot be used to re-enter upon.
Being hit and having to restart is true of any blots anywhere, not just the ones you might leave in your home board when bearing off against an opponent’s checker on the bar (or an opponent's checker occupying one or more of your inner points after he has re-entered from the bar). Also, no other checker can be moved on the board anywhere until all checkers on the bar have re-entered. The longer you spend on the bar the more moves your opponent can make without you being able to stop them. If you have two checkers on the bar and your dice roll only allows one of them to re-enter, then the remaining die is forfeit.
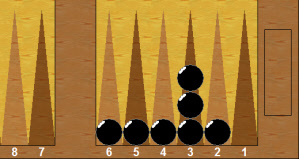
Blots in your home board are in great danger against opposition and must be avoided wherever possible. In Diagram 2 you have a blot on your 3-point and in Diagram 3a in Exercise 2 you have several blots! Many games that should have been won are lost when a blot is hit during the bear-off. Hopefully this section will teach you how to avoid this.
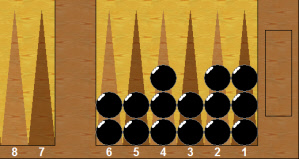
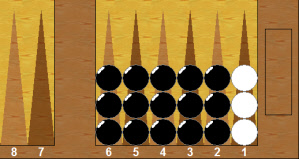
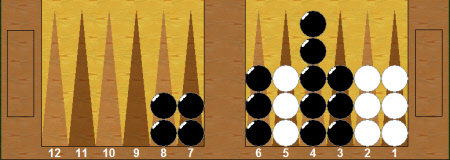
Exercise 3: Set up as Diagram 4 , with an opponent on the bar, his 25-point.
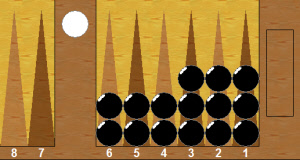
Diagram 4
Now bear-off, using the same dice rolls as for Diagram 1 , 6-1, 3-2, 4-2, 6-2 and it can be readily seen that if we make the same move with the 6-1, 6 off (shown as 6/0 where 0 is a checker taken off the board), 1/0 we leave a blot on the 6-point. If white rolls a 6 from the bar (it must be a 6 not 4-2, or 5-1 or 3-3 or 2-2 as these are blocked - remember, dice rolls are not added together, they are individual) on his turn he will hit your blot and force it to restart from the bar in his inner board - and, whilst there is a checker on the bar, remember no other piece can be moved until it has re-entered, sort of like rolling a 6 in ludo to start a checker off.
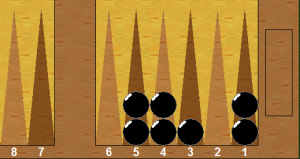
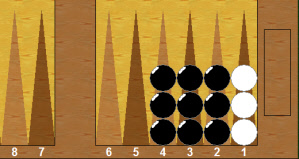
If you are on the bar and cannot re-enter then no other checkers can be moved and your move is forfeit. This is often called dancing or fanning and, if you have any blots exposed it is likely that your opponent can hit them too! So, we play 6/0 and we move the 1, 6/5 (6-point to 5-point) keeping the blot safe. With this in mind (assuming that white never re-enters on his roll except when there's a blot to hit) play the remaining rolls as safely as you can bearing off when you can and down when you can't: 3-2, 4-2, 6-2, and finally another 6-2 leaving the position in Diagram 4a If your board doesn’t match Diagram 4a restart and try again.
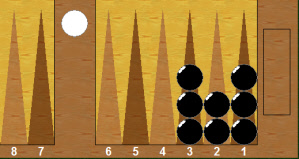
Diagram 4a
Remember, move off or down without leaving a lone checker(s), a blot(s), which white could hit from the bar forcing you to restart from the beginning with that/those checkers.
Now, it is getting quite difficult to take checkers off without leaving a blot - do you know how many rolls leave a blot next time? Don't forget that you are using two dice so each roll is in fact two rolls! To explain: Imagine you are using two different coloured dice, one black, one white and you roll a 3-2; with the black die on 3 and the white die on 2, but it could be the other way around, white die on 3, black die on 2 and still be only one move, 3-2. In fact, using two dice there are thirty-six combinations of dice rolls; so plenty to choose from! Later on you’ll have a chance to learn all thirty-six.
Back to the position in Diagram 4a How many of those thirty-six possible rolls will force a blot? Don't cheat by looking at the correct answer, write them all down. You should have twenty-five rolls that leave a blot. A quicker way to do it is to calculate the number of rolls that don't leave a blot - there are eleven that don’t: 6-1, 5-1, 4-1, 3-1, 2-1, 1-1 (note that I have only shown six rolls, this is because non-doubles such as 6-1 and 1-6 are shown just once as 6-1 and are counted twice).
Exercise 4: Practice a few bear-offs with a checker on the bar setting up as in Diagram 4 and see if you can avoid leaving blots, using your own dice rolls. It's not always possible to do so, but, often, with a little forethought you can considerably reduce the chances of doing so. This expertise is essential in playing winning backgammon and it is well worth the time taken to master it. Don’t forget that you don’t have to take a checker off each time. You can move within your home board if it’s possible to do so - just as long as you move the entire dice roll. Also, remember that you can move either die first.
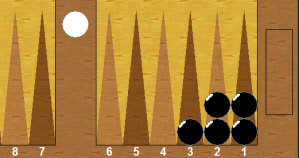
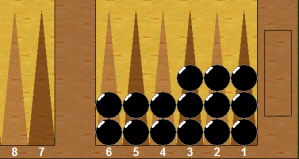
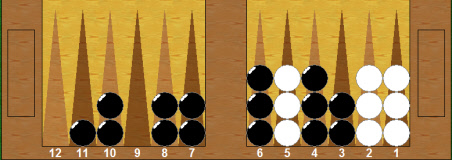
Diagram 4b
Look at Diagram 4b If you rolled 6-1 in this position, to avoid leaving a blot, you would move 3/2 with the 1, and then take off 2/0 with the 6. Perfectly legal. It is fine to move either die first; and often, the order in which you move them can make a big difference. Sometimes beginners forget they can do this and they leave a blot – cheering up their opponents who are just waiting for a blot to appear and to turn the game around with a timely hit.
One tip is try to keep your top two points evenly distributed, looking for the bad rolls next time. As a general guide if you are able to take 6-6 or 6-5 on the next roll without leaving a blot then you are almost 99% certain not to leave a blot on the forthcoming roll no matter what it might be - note, not 100% because on rare occasions blots can be left and you can do nothing about it.
Once you've mastered the tactic of bearing off safely against opposition from the bar we'll move on to opposition within your inner board. This is quite likely to happen and it is very important that you fully understand how to minimise your losing chances when your opponent is waiting to hit you back onto the bar from an occupied point within your own inner board.
|